Turns out, drawing an Iguana is more complicated than it sounds. I believe this creature has the most steps of any of the creatures I’ve shown you how to draw so far. Part of the reason for this is because I believe that Iguanas have gorgeous eyes, and I wanted to make sure this Iguana has them too! So, if you’re ready for a challenge: Here’s how to draw an Iguana!
Step 1:
Draw a circle. We’ll call the diameter of this circle 1 unit so make sure you know the diameter. This one is the shoulders. The center of the head should be 1 1/2 units away from the center of the shoulders, and the center of the hips should be 1 unit away from the center of the shoulders in the opposite direction. For the head, draw a 7/8th unit diameter circle. For the hips, draw a 3/4th diameter circle.

Step 2:
Connect the three circles along the back. 1/4 unit from where that line ends, start the nose. At the base of the nose there is a 1/8 unit bump where the eye will be. The nose should be 1/2 units long.

Step 3:
Under the mouth, there should be another parallel line so that the mouth is slightly open. The cheek is a semicircle, with a 3/4 unit diameter, and the end will be 1/8 unit away from the head. The elbow and knee will be 1/2 unit diameter circles. The center of the elbow will be 1 unit away from the center of the shoulders. The center of the knee will be 1 & 1/3 units away from the center of the hips. (another way to say this is the sides are 1/3 unit away from one another.)

Step 4:
Connect the elbow with the center of the shoulder. Draw a 3/8 diameter circle with a center 1/2 units away from the center of the elbow and connect them.
Connect the knee to the hip. Draw a 1/4 diameter circle whose center is 1/2 unit away from the center of the knee (or whose edge is 1/8th unit away from the edge of the knee).
Draw a beard 1 unit down from the head, connecting the chin to the shoulder. Think of the shape as a wavy square.

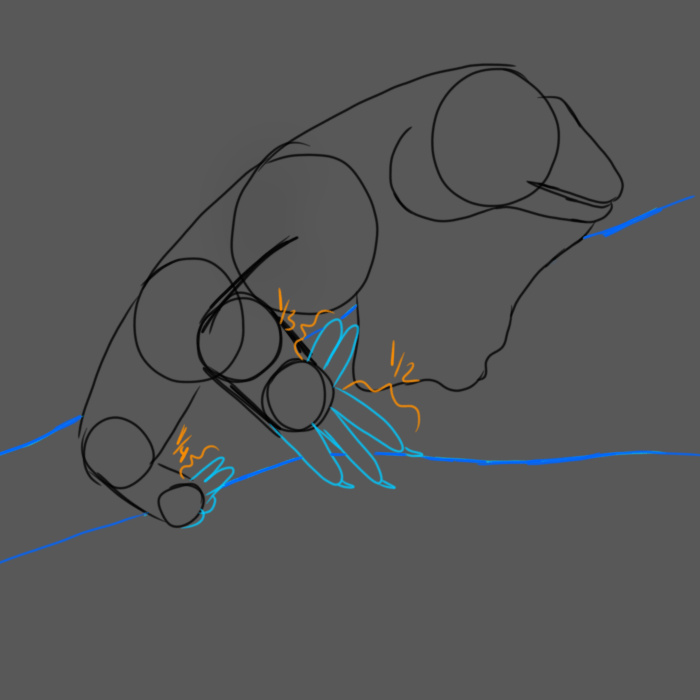
Step 5:
Next we draw the toes and branch. The front foot’s front facing toes are 1/2 units long, and the two thumbs are 1/3 units long. The thumbs on the rear foot are 1/4 units long. Draw two bumps to indicate the front facing toes on the back foot. Draw a branch behind the feet, it doesn’t matter what shape it is as long as both of the feet are grabbing it.
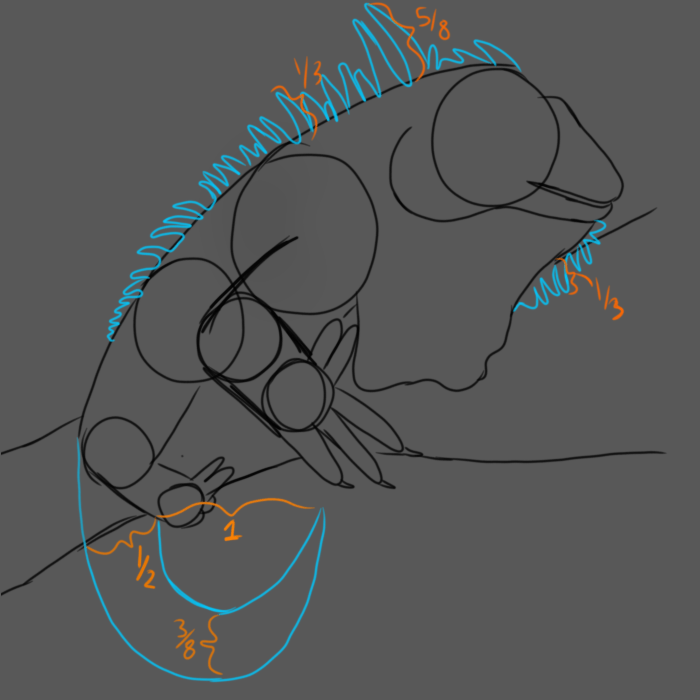
Step 6:
This is probably the hardest step, but also one with a lot of freedom to play around with size and shape.
a) Draw Spikes along the back, Taller at the front, (5/8ths units at the tallest) and getting shorter as you go further back. The average height should be around 1/3 units, and some can be broken off rather than going to a point.
b) Along the chin flap, draw some 1/3 tall spikes that get slightly shorter at either end.
c) Extend the line from the back/rear leg down to the end of the branch.
d) 1/2 unit away from the end of that line begin a 1 unit diameter semicircle.
e) The width of the tail should be 3/8ths of a unit at the lowest point, and 1/2 of a unit at the base. Complete the tail with a curve from the tip to the base.
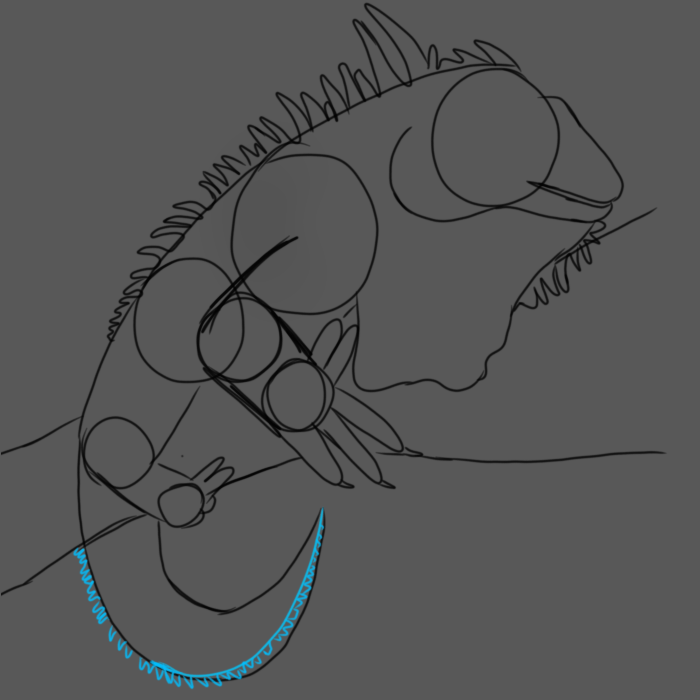
Step 7:
Draw a curve from the tip of the tail to a point 2/3rds down the edge of the lower edge of the tail. Draw short spikes along this curve and up to the branch.
Step 8:
Erase the circles, anything behind the branch, and any lines that separate spikes from the rest of the body.

Step 9:
Time to add finishing touches. Draw a squished C shape for the nostril.
Where the beard meets the front leg, extend a curve up 5/8ths of a unit to complete the leg.
On the cheek make two concentric circles.
Add toenails to any toes that need them.
Finally draw a 1/8th diameter circle on the face for the eye. It should be under where the nose bump meets the head.

Step 10:
One of my proudest parts of this page’s drawing was the realism I put into the Iguana’s eye, so from now on we will zoom in on the eye to show the details as we go.
Draw a line across the top of the circle that extends a little past the edges.
Draw a circle towards the front for the pupil.
Draw curve across the bottom of the eye that stops at the edges.

Step 11:
Erase the outer lines.

Step 12:
Draw an egg shape around the eye, but erase the tip of the egg.

Step 13:
Draw two curves, one above and one below the eye. The top one should be longer.

Step 14:
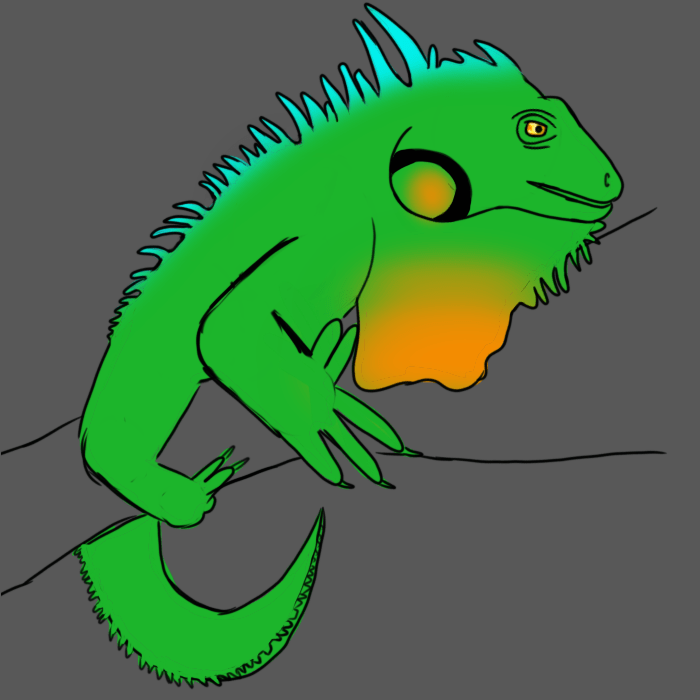
Now we are done with the line-work, so we will begin coloring. First we will color the inside of the eye yellow. Most of the rest of the body is green, with the spikes on the back being cyan, an orange circle on the cheek, and the bottom of the chin flap being orange. The colors should blend into one another.
Step 15:
Now we add details. Lighten and darken areas to make stripes along the back and tail. On the back, light stripes come from the top and dark from the bottom. On the tail, light stripes go all the way across the tail, are wider at the top and bottom, and almost connect or connect at the top. The dark stripes on the tail should go about halfway, and be in between the white strips at the bottom.

Along the edges of the eye and in a semicircle at the back end of the eye, add some orange.

Step 16:
Now we’ll add shading. Add highlights to the eye. Lighten a backwards 7 next to the pupil, and a dot in the lower-rear.

Add highlights and shadows to the rest of the drawing.
Everywhere there would be visible scales, (everywhere that isn’t the eye, cheek or chin flap) make dots. In darker shadows add larger, and darker dots. In lighter areas, add smaller and lighter dots. In and around highlights white dots can be added.
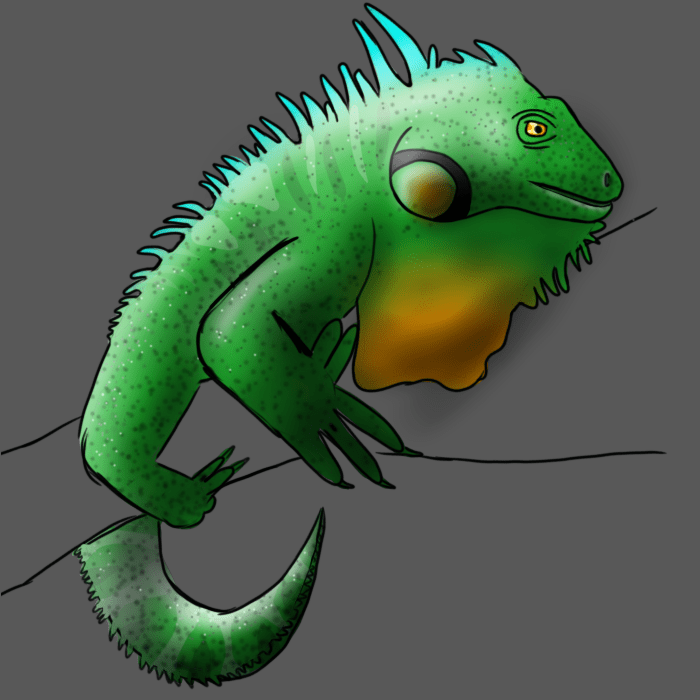
So that’s how you draw an Iguana! Drawing the Iguana for this page of the book took a long time and a lot of different reference photos to complete. Like the poem in the book says there are many different species of iguana, so I wanted to draw one that had all the traits typical of the various kinds. I ended up going with a green iguana. I also wanted to find a pose that showed the same relaxed and carefree mood that the poem had. I made sure the background was soft so that the animal would stand out, because these guys are masters of camouflage. So that’s how I drew the Iguana for the book. Be sure to check it out if you have the chance!
