The okapi has been my favorite animal since I was learning to talk and was a no brainier to put in this book. Anatomically speaking, this creature is built like a long necked horse with big shoulders (or more accurately: a short necked giraffe), so if you know how to draw a horse it is quite easy to transform that into an okapi by elongating the neck and giving it stripes on it’s legs and rump. To get a baby, just make the adult smaller with spindlier legs. In the spirit of the behind the scenes, here’s how I drew the Okapis.
Step 1:
To begin let’s draw two circles. Make sure you know the diameter of the circle to the right, as we will use that for determining proportions. The left circle will be the shoulders, and should have a diameter of 1 and 1/4th unit. The circles should be touching on the sides and line up horizontally on the bottom.

Step 2:
Draw a circle with a 1/2 unit diameter and a center 3/4ths of a unit away from the edge of the larger circle.
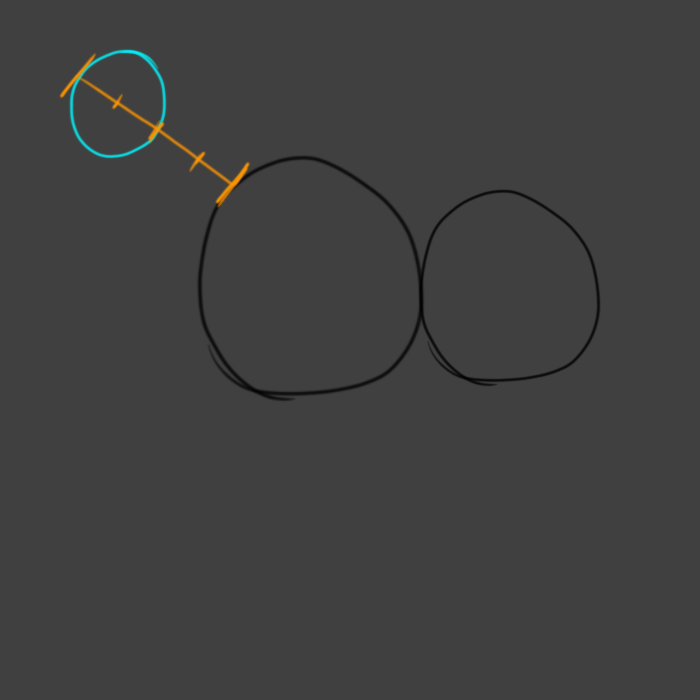
Step 3:
Connect the head and shoulders with a pair of lines, and the shoulders and hips with some curves.
For the nose, draw a curve off the head who’s furthest point is somewhere between 1/4th of a unit and 1/2 of a unit away from the edge of the head. The bottom of the curve should be flat and nearly horizontal, while the top of the nose curves in just slightly before connecting to the head.
You can play around with the exact shape and length of the nose a bit to give the okapi the expression you want. Making it smaller and flatter at the tip of the nose will give it a more cute face. Making the tip of the nose rounder and fatter will make the okapi look older and calmer. Here I went for a something in the middle.

Step 4:
To make the ears, first draw a teardrop shape where the nose meets the head. Then draw a slightly thicker teardrop shape on top of the head. both ears should point directly away from the head. (for a more alert expression, instead of drawing the second ear on top of the head, look at where the first one is on the head circle and make the second ear symmetrical to it.)
To make the legs: Draw a curve from the front of each of the body circles that is 1 and 1/2 units long.
At the end of the front leg, draw a short horizontal line. Then draw a straight line back up, parallel to only the very bottom of the curve, that is 1/2 of a unit long.

Step 5:
To complete the ears: Draw a line from the top of the ears to the head. The line should be on top of the ear, unless the ear near is straight up and down in which case it should be behind the ear.
For the front leg: Draw a curve inwards from the line up on the back of the leg, then have it go straight up to the body.
For the hind legs: Draw a short line backwards. Then draw a short line up and a curve backwards, that add up to 1/4th of a unit in length. Then draw a line 3/4ths of a unit up. Repeat the process for the far hind leg, but the first short line should be slightly shorter and slightly above the bottom of the first leg because it is behind it.

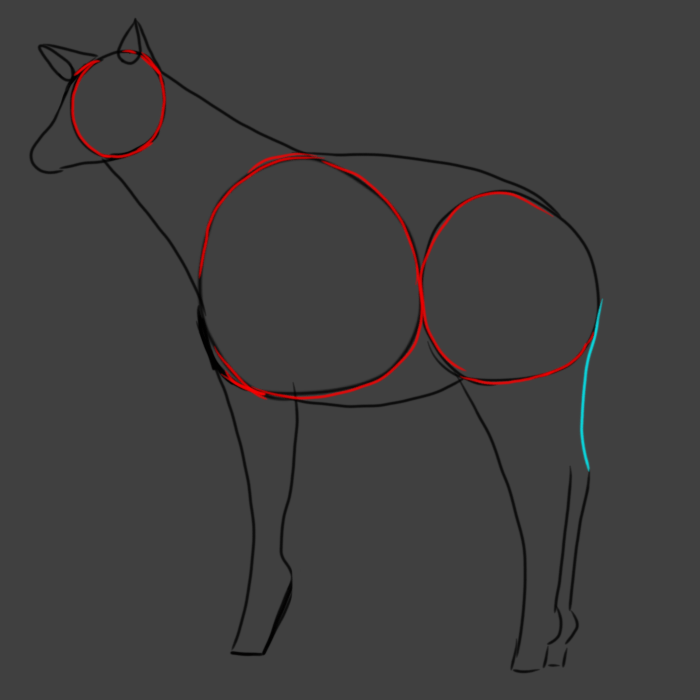
Step 6:
Connect the far hind leg to the rump with a slight inward curve.
Erase all the circles inside the body.
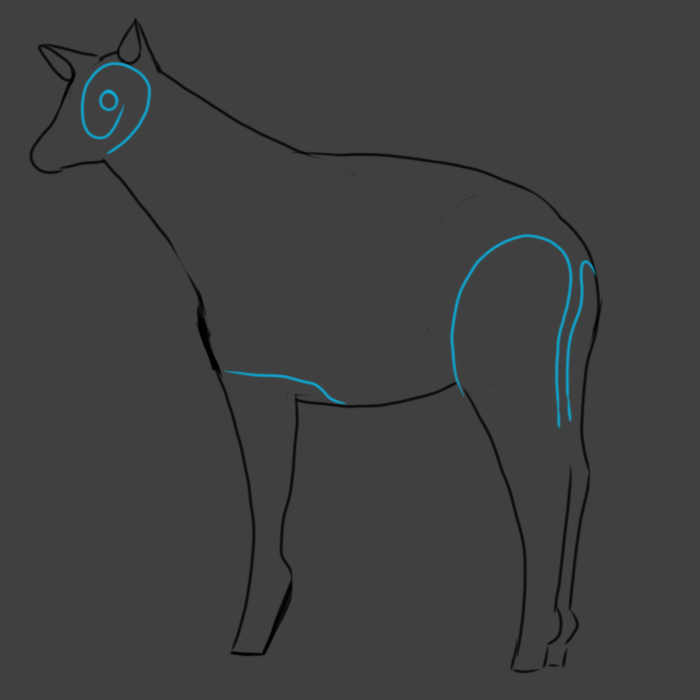
Step 7:
Now we begin the markings and tail.
For the eye, draw a small circle in the upper center of the head. Around that circle, draw an oval spiral [long sides pointing up and down] beginning behind the eye and making about 1 and 1/4 rotations to end where the chin meets the neck.
Above the front leg, draw a horizontal line to a little bit past the end of the leg, and then connect it to the belly.
For the tail, start a short bit above the end of the front leg, and draw a 3/4ths of a unit long line up from a point slightly above where the near leg ends. Draw a parallel line to the right of it. Then connect the right line to the edge of the rump with a half circle, and the left line to the front of the leg with a curve.
Step 8:
To complete the tail, we draw two outward curves connecting each side of the tail to where the near leg stops being drawn.
To complete the markings on the face Draw a line connecting the two ends of the spiral.
To make the hoof markings draw a diagonal line 45 degrees up and forwards from the back of the front hoof and near rear hoof [not the far rear hoof].
Above and parallel to these lines, draw another line. On the far rear hoof draw a line similar to this one.
Near but slightly below the top of the bulge on each of the legs, draw a line across the legs.

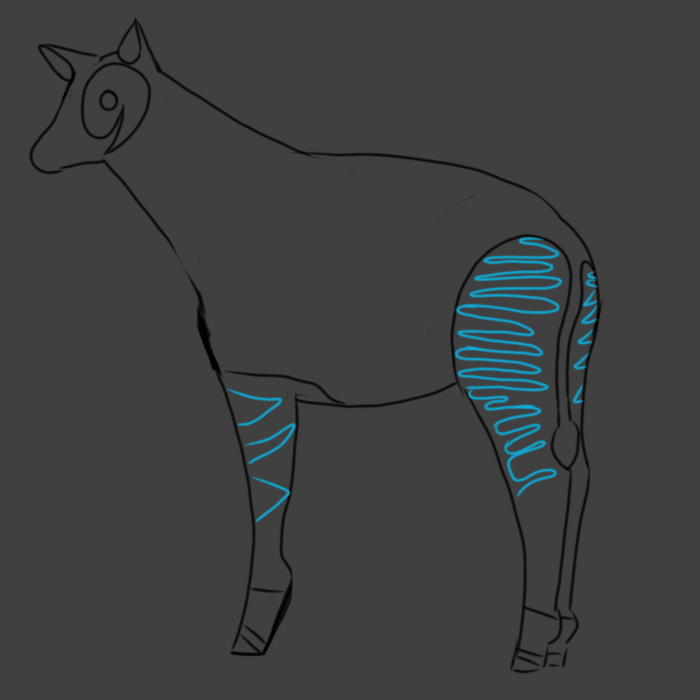
Step 9:
On the front legs, draw at least 3, no more than 5 triangles off the upper front part of the leg (it varies between okapis, this one has 3). Most of them should touch the other side, but not all of them have to. There should be at least a little space between the bottom triangle and the bulge on the leg.
On the rump, to the right of the tail draw at least 7 triangles (however many fit nicely as this also varies between individual okapis) connected to the right side of the rump.
Lastly, draw a squiggly line back and forth across the space to the right of the tail. The squiggle should always touch (or almost touch) the left side of the space, and cover most of the area without ever touching the tail. The squiggle should be thinner and further apart the further down the rump it is, ending by connecting to the edge just below the tail.
Step 10:
From where the squiggle connects on top to the top of the leg, erase the curve that separates the area inside the squiggle from the rest of the body.

Step 11:
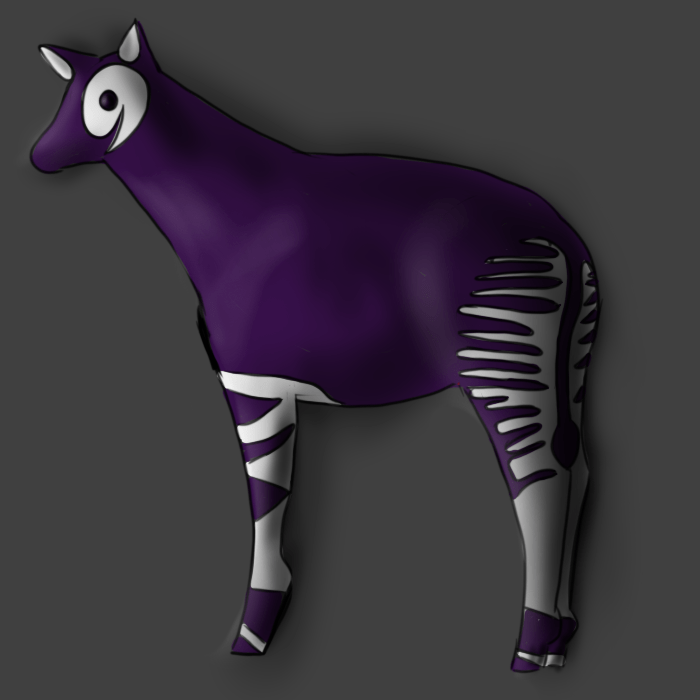
Next we color the Okapi. We’ll start with the white markings because all okapis have white. First we color the inside of the ears and spiral. The negative space on the legs will be white, stopping at the line just below the bulge on the leg. Leave a stripe blank on each leg, then in the space below that stripe fill in the next stripe.
The rest of the Okapi will be filled in with the base fur color. There is as much variation in okapi coat coloring as there is in their number and shape of stripes, and it even varies depending on the light. Okapi coats vary anywhere from purple, to black, to the many shades of brown. We will pick a coat color and fill in the rest of the okapi. In the book I chose to make the baby a blackish brown, and the mother purple, because that was the color of the okapis at the zoo that made me love okapis so much (more on that at the end).

Step 12:
Lastly we add shading. In this case I was a lot more liberal with darkening areas than usual, because the coat itself becomes black when there is not direct light on it. I lightened mostly in the white areas, in the purple I only added a little white on the chest, eye, and tip of the nose.
So that’s how you draw an okapi!
I fell in love with the Okapi at a very young age. My parent’s would often take me to Brookfeild Zoo and that was where I learned about them. The okapi was always hard to find because of it’s camouflage, so it was always a treasure hunt to find it. Depending on the light the okapi sometimes seemed from brown to and sometimes purple. I knew from what my parents read to me on the signs that it was rare. What little girl could resist a rare purple almost-horse that liked to play hide and seek! As I grew older, I got a little tired of having a favorite animal nobody had heard of, and I kinda forgot about the okapi for awhile. But that was only until I heard that the okapi at the zoo had a baby. At this point I was old enough to learn more about the animal, like how it was endangered, related to giraffes, and how they use their stripes to recognize and follow their mothers. The more I learned about this animal the more I loved them. Of course there are the popular animals, which are fascinating to no end in and of themselves, but if you look just a little bit deeper you realize just how many diverse and fascinating animals there are, that you could go your whole life studying them and still find out more, and it’s awe inspiring! That was part of the reason that I chose to write this book, to showcase some of the rarer animals in the world, to inspire kids and adults alike with the same love of creation and curiosity this creature inspired in me. This book may be aimed at children, but I hope this book is something that all ages will enjoy.
